Showing posts with label thrifty. Show all posts

Friday, 24 October 2025

DIY Fire Bowl/Indoor Fire Pit for Ambiance, Rituals, Warmth, and Witchery ~ For Around $20 or Less

DIY tabletop fire bowl on patio table

As always, if you just want the instructions, without the story behind it, click here.

I’ve been working on creating a “back yard oasis” since moving into my current home. Part of that includes a sheltered, outdoor “living room” — a seating space that combines being outside and enjoying nature with the comfort, convenience, and ambience of a traditional living room and some-time cigar lounge. This seating area is on the patio, under a gazebo (which also houses the sheltered dining area), and I was originally planning to have one of those propane “fire pit” tables in the middle of it, but it turns out they are not safe in a soft-top gazebo unless the roof is much higher than mine.

So I looked up “indoor fire pits” — and laughed out loud (after I picked my jaw back up off my desk). Apparently, ambience is worth its weight in gold these days. “Absolutely NOT, mass consumerism machine — I’m not feeding you today!”

The most plain and basic ones started at $30.00, and ones anywhere close to the look I was going for were more like $99.00 and up. Considering they are all, literally, simply an inner receptacle for alcohol or similar fuel, with varying outer containers, filler, and rocks or fire glass or whatever, I knew I could make something better, safer, and far cheaper that still looked like it belonged in my backyard oasis for ambience, s’mores, heat, ritual, or all of the above.

By the time it was assembled, all four elements were already right there in the bowl — earth in the sand, water in the shimmer of the glass (which is, technically, liquid), fire at the centre, and air rising with the incense smoke when I stuck some sticks into the sand. Balance in a bowl.

For around twenty dollars or less, and maybe as many minutes of your time, you can build your own, personal, indoor/outdoor hearth — portable, beautiful, and endlessly adaptable. Whether it’s the centrepiece for a ritual, a quiet evening by yourself, or a way to keep the vibe alive when the weather turns, this little fire bowl proves that warmth and witchery don’t have to come with a luxury price tag.

Mine cost closer to the twenty than the “or less,” because I already had a very specific vision in mind, so I paid about $10 (plus tax) just for the bowl — but if I’d been willing to go for even a slightly different look, I could have got everything for about that amount. It’s also good to remember that often, Walmart has the same things for cheaper than the dollar store, so always check if you have both nearby. Also, there are thrift stores, Buy Nothing, and Freecycle type groups, where you can find all kinds of treasures, not to mention give new homes to things you want out of your space, but not in the landfills!

Finished fire bowl close-up with glowing glass

Make Your Own Fire Bowl/Indoor Fire Pit

Supplies:

• Bowl ($9.98)
The main structure of the fire bowl. I used a ceramic planter, but it can be literally any type, shape, or size container, as long as it’s made of some kind of fire-proof material. Dollar store finds can work; Walmart was cheaper for me on the day.

• Sand ($4.97 for a 44-lb bag)
Insulates to keep fire and heat contained and outer surfaces cool, weights the bottom so it won’t tip, and acts as the base for stones and the fuel canister.

• Tuna (or similar) tin with smooth-edge lid (free)
Fuel canister. Holds alcohol/gel/oil fuel. Lid extinguishes flame and slows evaporation.

• Side-cut / “safe-cut” can opener (assumed on hand)
Needed to create that smooth reusable lid.

• Slightly larger tin (I used a dolmas tin) (free)
Holds back sand/stones and anchors the inner fuel canister.

• Decorative stones/glass ($2.94)
Optional but pretty. I used Gold, Gold Matte Metal, and Ruby Red glass gems. Any fireproof stones, glass, marbles, tiles, pea gravel, crystals, etc. will do.

• 20–22-gauge wire (under $1 of a $4.97 roll)
For a simple “D” handle on the lid.

• HVAC tape (under $1 of a $5.78 roll)
To affix the handle to the lid — heat-resistant and nearly invisible on metal.

• Coaster ($2.00 or less)
Optional cover to hide the fitted lid when not in use; also a resting place for the hot lid. Stone/ceramic/metal all fine; tiles or found lids work too.

• 70% isopropyl alcohol ($2.98/qt)
Fuel. 70% gives visible orange/yellow flames; 90% burns hotter and bluer. Alternatives: hand sanitiser, Sterno/gel fuel, torch oil, buddy burner, paper/twigs (more smoke).

Instructions:

  • Fill base container with sand to ~1″ from top. Pack down lightly.

Sand base close-up

  • Press the larger tin down to make a well; pack surrounding sand firmly and level to the bowl’s edge.

Making the well for the can

  • Place tins nested together in the well. Arrange stones/gravel around them.

Nested cans with stones

  • Make a “D”-shaped wire handle for the lid; affix with HVAC tape (I covered the lid for a uniform look).

Lid with wire handle and HVAC tape Fuel cup lid detail with handle

Finished bowl assembled on table

  • Fill the inner can with alcohol and light. If it doesn’t catch right away, hold the flame longer; cold fuel takes longer to ignite.

Flame test close-up 

Safety & Fuel Notes

A few things to keep your fire bowl happy, healthy, and not accidentally explosive.

Fuel choices:
70% isopropyl alcohol burns the cleanest and gives you those lovely, visible orange-yellow flames that feel like actual fire, rather than the eerie blue lab-burner look of 90%. You can also use hand sanitiser, Sterno, or other gel fuels, torch oil, cooking oil, or even a buddy burner if you fancy making your own. Twigs and paper work too, though they’ll smoke a bit more.

Ventilation:
If you’re using alcohol as your fuel, it’s perfectly fine to use your fire bowl in an enclosed space — as long as it’s not too small or sealed tighter than a submarine. A bit of airflow is all that’s needed. Isopropyl burns cleanly, producing mostly carbon dioxide and water vapour, with minimal carbon monoxide. So yes, gazebos, sunrooms, and lounges are all fair game. Just avoid lighting it in a broom closet… or anything smaller than you are.

General sense & self-preservation:

  • Never pour more fuel into a still-warm can. Let it cool first — it’s patient, you can be too.
  • Keep it on a stable, heat-resistant surface.
  • Extinguish with the fitted lid, not your breath. (The latter works, but tends to singe eyebrows.)
  • And for the love of common sense, keep sleeves, scarves, and wandering pets clear of the flame.

That’s it. Fire is a living thing — respect it a little, and it’ll serve you faithfully for years.


Thursday, 23 October 2025

A properly stocked kitchen is the first step to a well stocked larder (every day preps)

 The title of the post really says it all. 

I've been told so many times, by so many people, when talking about being prepared for whatever comes along, "I wouldn't even know where to begin!", and so I finally decided to tackle that question with a post.

So, I started to write a post about how to build a well stocked larder.

It wasn't long before I realised that I had gotten way ahead of myself. 

You can't well use the contents of even the most generously stocked larder if it is not supported by a good foundation of the essential basics.

It turns out I was coming from the starting point of presupposing that "everybody" has certain things on hand in their kitchen or pantry. 
That just isn't true anymore, and most people who are saying, "Where do I even start?", are not coming from that place.

Let's face it. Most people in modern times are not coming from that place!

More and more these days, people don't cook. Folks order takeout,  go out to eat, or eat fast food and pre-packaged meals. 
Even when most people say they "cook", what they really mean is that they take a box or a can from the shelf, or a package from the freezer, and heat it up, maybe even in the oven or on the stove. 
Or, if they are feeling really ambitious, the packaging will have different components that need to be prepared, packets added, water, or some milk and butter stirred in, or they use meal kits, that come with exact amounts of everything they need to make a single meal. 

Articles that offer dinner recipes ready in an hour or less are almost completely out of fashion, because who has time to spend more than 20 minutes, TOPS on dinner!? If you can't get it done faster than delivery can get it done, why bother?

When COVID hit, lots of folks realised just how much we, as a society, have come to rely on and take for granted being able to just stop and grab dinner on the way home every day, or otherwise have immediate and pretty much round the clock access to whatever we want, when we want it. 
When I initially started this post, a month or more into some level or another of "lockdown" for most of the Western world, and just starting to gradually ease out of such restrictions in some places, many people were tired of living on ramen and other instant foods, or maybe they just couldn't get them, because the stores were still out of them. 

Either way, more people than ever in the last couple decades or more began cooking all or most of their meals at home, and, for more than a few, it was a frightening foray deep into the unknown. 

I actually remember a time before there were microwaves - and, therefore, microwave meals, food delivery other than pizza or Chinese (and then only in  more populated areas, usually near a big city), 24-hour grocery stores, meal kits, and tons of the other things that are simply commonplace today, and most people ate dinner at home, that was cooked from scratch at home, the majority of the time, but that is "ancient history" to a lot of you. Yes, brontosaurus burgers were very tasty. Thank you for asking!

So! for the most basic, bare bones things you need to have on hand in your kitchen/pantry in order to make a meal from just about anything - or even just from those things, in times of desperation, check out this post. 

Once you've got that down, then come back here and learn how to take it from bare bones to properly stocked. 

So, you have the absolute essentials. You're not going to starve if the shit hits the fan, and you've experimented with what you happen to have on hand or what was on sale, or a few things you got for the recipes you found and made. Now what?

Now, it’s time to build out that foundation into something you can actually live with - not just survive on. This is the level where your kitchen stops being a room full of random ingredients and starts being your most powerful tool for independence.

The good news is that “properly stocked” doesn’t have to mean crammed full or expensive. It means balanced, flexible, and ready - you’ve got the essentials to make real food, most days, without needing to run to the store every time you want to cook something that didn’t come in a box.

First Step: The Universal Pantry Core

Every cuisine in the world is built on some combination of fat, acid, salt, and flavour base. You’ve already got fat and salt covered - so let’s expand that toolkit.
 

Flavour Builders

These are your everyday magic-makers. They show up in nearly every cuisine and will keep you from falling into the “beans and rice again?” blues.

  • Onions, garlic, and celery – The holy trinity of almost everything. Buy fresh when you can, but dried or frozen works fine too.
  • Broth or bouillon – Vegetable, chicken, beef. Great for soups, stews, grains, and flavouring beans. And you can make your own bone broth  or vegetable broth for free!
  • Tomato paste or canned tomatoes – Adds umami depth and tang.
  • Vinegar – White vinegar for cleaning and basic cooking, plus one or more additional types of vinegar (apple cider, wine, rice, etc.) for dressings, sauces, and more complex recipes. You can always buy just one additional kind per month, until you have all the types you want on hand, depending on the kinds of recipes you'll be making. More on that in the next food stocking post. 
  • Soy sauce and/or Worcestershire - Salt plus savoury/umami punch.
  • Mustard - Yellow for classic comfort food, Dijon for a touch of sophistication. More types as you go for branching out. 
  • Hot sauce and/or chili flakes - Pick one or two you like and use it with abandon. (Your ten-plus collection belongs in the "Well Stocked Larder" section, later.)
  • Honey, molasses, and/or maple syrup - Sweeten, glaze, and balance acidic or spicy dishes.
  • Lemon juice or bottled citrus - Brightens almost anything.

  • A handful of versatile dried herbs and spices:
  • Black pepper
  • Paprika (sweet or smoked)
  • Oregano or Italian blend
  • Basil or thyme
  • Cumin
  • Cinnamon


If you’ve got those, you can create just about any flavour profile with a few tweaks.

Proteins That Stretch

Protein keeps you full and powers all the repair work your body does, but it doesn’t have to mean expensive cuts of meat. Mix shelf-stable and fresh options for balance:

  • Eggs – Fresh, or powdered for backup.
  • Fresh or frozen cuts on sale or in bulk – Especially stuff marked down for quick sale! Remember, you can freeze portions that you won't use right away. This is where a vacuum sealer really comes in handy. 
  • Canned tuna, chicken, or salmon – Quick proteins with long shelf life.
  • Lentils – They cook fast, keep forever, and can go from soup to curry.
  • Beans (dry or canned) – You’ve already got these, but variety helps.
  • Nut butters – Energy, fat, and protein in one spoonful.
  • Cured or shelf-stable meats – Bacon bits, spam, corned beef, pepperoni.


Grains & Starches

Flour, oats, and rice are the backbone; now let’s give them some friends.

  • Pasta – In all its glorious forms.
  • Cornmeal or polenta – Fried mush, cornbread, grits - all comfort.
  • Breadcrumbs or panko – Stretch meat, coat fried foods, thicken stews.
  • Potatoes – Fresh, powdered, or dehydrated flakes.
  • Tortillas, crackers, or shelf-stable wraps – Fast carb delivery systems.
  • Dry cereals (hot and cold ones) - But rather than buying the pre-made "9 grain hot cereal" and similar mixes, make your own, on the cheap, by adding other grains and seeds to your oats. Recipes coming soon(ish), and will be linked here. 


Vegetables & Fruit

Variety is both nutrition and morale. Keep a mix of fresh, frozen, and shelf-stable on hand.

  • Frozen mixed veggies – Don’t knock them. Perfect for soups, pot pies, and stir-fries.
  • Canned goods – Tomatoes, corn, peas, carrots, green beans, fruit.
  • Dried veg mix – Great for soups and emergencies.
  • Root vegetables – Onions, carrots, garlic, potatoes - they last ages if stored right.
  • Dried fruit or fruit cups – Sweet snacks and baking boosters.


Dairy & Alternatives

You don’t need a dairy aisle in your fridge, just the key players.

  • Fresh, powdered and/or evaporated milk – For sauces, baking, and tea (or coffee, in a pinch, if you don't have half and half, or are a savage, heathen.. err, I mean, not a coffee snob).
  • Cheeses – Whatever variety(ies) you will be using most, in blocks and/or shredded. Both freeze well. I recommend buying in bulk and separating into 1/2 lb to 1 lb blocks/bags. Vacuum seal the smaller blocks, and store the shredded in quart freezer bags with all the air squeezed out. Don't forget to label things clearly!
  • Butter and/or ghee – Adds flavour and stability.
  • Plant milks (if applicable) – Almond, soy, oat, whatever fits your diet.


Tools & Kitchen Consumables

Your food is only as useful as your ability to cook it. If you’re missing a few basics, pick them up second-hand or one at a time.

  • Baking sheet & casserole dish
  • Frying pans, saucepans, and at least one really large (5 qt or more) pot or Dutch Oven - Cast iron is extremely versatile, can be used directly in/on open flame, and will last multiple generations with a little TLC. 
  • Mixing bowls
  • Measuring cups/spoons
  • Wooden spoon 
  • Cooking spatula (AKA pancake turner) 
  • Rubber spatula
  • Whisk
  • Strainer/colander
  • Foil
  • Parchment paper
  • Plastic wrap
  • Storage containers or reusable freezer bags


Next Step: Add Your Own Flavour

Once your basics are set, then you can start flavour-branching. These are small, high-impact tweaks that steer your kitchen toward your favourite cuisines without cluttering your shelves. 

Start with one region or comfort zone and expand naturally. If your spice shelf starts to look like it’s holding a UN summit, congratulations - you’re doing something right!

Here are some examples...

Italian / Mediterranean

  • Olive oil
  • Balsamic vinegar
  • Oregano
  • Garlic
  • Pasta
  • Canned tomatoes

Mexican / Latin

  • Cumin
  • Chili powder
  • Beans
  • Rice
  • Tortillas
  • Salsa

Asian

  • Soy sauce
  • Sesame oil
  • Lime juice 
  • Rice vinegar
  • Ginger
  • Garlic
  • Rice noodles
  • Sriracha sauce 

American Comfort Foods

  • Ketchup
  • Mustard
  • Gravy mixes
  • BBQ sauce
  • Bouillon


Remember - Build It Slowly

The biggest mistake people make is trying to “complete” a kitchen in one shopping trip. 

Don’t.

Add one or two new things each week - maybe a spice, a different type of beans, a bag of another rice variety.
Tape a “use-and-replenish” list inside a cupboard door. If you use the last of something, or, better yet, if it's getting low, it goes on that list immediately.

The goal is to cook regularly from what you store and store what you actually cook. That’s how your kitchen stays both thrifty and reliable - no more mystery cans from the apocalypse of 2008!

Next Stop: The Larder

At this point, you’ve moved from bare survival to functional, flexible living. You can make a real variety of meals, feed others, and handle a few weeks of disruption without stress.

In the next post of this mini-series, we’ll move on to the well stocked larder - where things start getting deep, literally and figuratively. That’s where we talk about bulk buying, rotation systems, long-term storage, and yes - the luxury of ten mustards, twelve vinegars, and a hot sauce for every mood. That next post will be linked here as soon as it goes live. 

Because preparedness isn’t about hoarding; it’s about Freedom!
 

Tuesday, 10 October 2017

Save those seeds! It's not just pumpkin seeds that make great roasting!

It's Thrifty Food Tip time again, and since it's a classic fall morning here at the Wolf Den, I figured this would be the perfect thing for the season.


Roasted pumpkin seeds are definitely one of those things we associate with autumn. Their warm, toasty, nutty, slightly salty flavour makes for a great, healthy snack. While the pre-packaged ones are ok, nothing beats having them fresh, just as soon as they're cooled off enough from the oven! 
(Hmm.. Speaking of which, now I've got a craving! That's a hazard of writing the food-related portions of this blog. LOL)

As tasty as they are, what's even better is a medley of roasted/toasted seeds. You can roast up the seeds from cantaloupe, honeydew, watermelon, acorn squash, spaghetti squash, butternut squash, and pretty much any other gourd, squash, or melon you can think of, with delicious and nutritious results. 

That's right; I said nutritious!
Squash and melon seeds are simply teeming with health benefits.

Cantaloupe, honeydew, and other "muskmelon" seeds are super high in antioxidant vitamins, minerals, amino acids, as well as being a great source of fibre and healthy fats. 
Watermelon seeds contain all those too, in addition to a good dose of folate (AKA vitamin B9), iron, and the plant protein, lycopene, which, in addition to being a great protein source, is another heart health booster.

Not to be outdone, squash seeds contain all the above vitamins and minerals, plus zinc, which is another immune system benefactor. Zinc also promotes healthy cell growth and division, sleep, mood, senses of taste and smell, eye and skin health, insulin regulation, and increases prostate health.

 Vitamins A, C, and E can improve and preserve your vision by helping to prevent macular degeneration, and, of course, we all know that vitamin C gives us a great boost to our immune system, which, considering that fall also marks the start of cold and flu season, is an especially good thing.
 

Important minerals contained in the seeds, like magnesium, phosphorous, iron, calcium, and potassium help control cholesterol, regulate blood pressure and cardiovascular function, improve bone density, immunity, metabolism, and brain function, and decrease the risk of developing type 2 diabetes and cancer
The heart healthy omega-3 fatty acids help reduce the risk of stroke, heart attack, and other cardiovascular diseases by lowering the levels of "bad" (LDL) cholesterol in the blood.

Finally, a diet high in fibre adds its own cholesterol, blood pressure, and blood glucose lowering properties, as well as promoting bowel health, for the prevention of things like IBS, diverticulosis, and diverticulitis. 

SO...
With all those health perks, great taste, and a FREE price tag, what's not to love?

Oh! And did I mention that it's mega simple to roast them, you can give them just about any flavour profile you want, and it's a great, fun activity to do with kids? 


Ingredients: 
  • seeds
  • enough oil (coconut, olive, grapeseed, peanut, etc.. whatever you want) to lightly coat the seeds
  • salt, pepper, and/or whatever spices/seasonings you like


Directions:
  1. separate seeds from the bulk of the pulp and give them a quick rinse. Don't worry about removing all of the pulp/flesh. It will roast up nicely and add the flavour and fibre content.
  2. Preheat oven to 300°F. (you can use a higher temp, however, keeping it at or below
    300°F will retain most of the nutrients which high heat will destroy.)
  3. Toss together all ingredients until seeds are coated evenly with oil and seasonings
  4. Spread seeds in a single layer in a cast iron skillet, stoneware, or parchment lined baking sheet. Bake, checking and stirring every 15 minutes, until seeds are crisp and pulp is caramelized, probably about 20-40 minutes. 
  5. Let cool completely before serving/eating (OK.. Who am I kidding? At least let them cool enough to avoid burning yourself or others!)


Seasoning suggestions:
  • Olive oil, sea salt, and freshly ground pepper medley
  • Peanut oil, soy sauce, and sesame oil. Add extra flavour and texture with some dried seaweed flakes and/or kick it up a notch with some hot chilli oil. 
  • More savoury seasoning ideas: curry, cumin, chilli powder, garlic powder, onion powder, ranch dressing powdered mix, other dry soup or dip mixes
  • coconut oil, cinnamon, nutmeg, and vanilla. Add a little sweetness with a drizzle of honey
  • coconut oil, cocoa powder and cinnamon
  • coconut oil, ground cloves and cardamom

What to do with roasted seeds:
  • Use as a coating for fried chicken
  • Add to home made granola
  • Bake into granola bars
  • Top your yogurt
  • Mix into your oatmeal
  • Add to dry cereal
  • Put them in trail mix
  • Add to smoothies
  • Use in whole grain and seed breads
  • Add to muffins, coffee cake, and other baked goods
  • Add to salads
  • Use them in pesto
  • And, of course, you can just munch on them by themselves!

Tuesday, 3 October 2017

Presto Pesto Norwesto! (Delicious pesto for almost free!)

Today's thrifty food tip is also a recipe, just cause I can. 😎 

 As always, if you just want the recipe, without the story behind it, click here, or check out the AllRecipes Link. And if you make it (or someone else makes it and you eat it), PLEASE leave a review there too! 


 Pesto is, oddly, at once underrated and overpriced.

Dishes made with the warm, nutty, aromatic blend, as well as the ready-made stuff in a jar are nearly always outrageously priced. Perhaps that's what leads folks to think it is expensive or difficult to make, and why so few people make regular use of it in their own kitchens and cooking. 

The truth is that it takes a few minutes to make in a blender or food processor, and, even using the "finest" ingredients, the stuff is literally pennies a serving.

It's basil, pine nuts, garlic, olive oil, parmesan, and a little salt and pepper. That's it. So, already, it's super economical to make it at home, especially if you or someone you know grows their own basil.
Many folk cut the basil with spinach to save money and/or tone down the flavour a bit. 


The thing is though, you don't even need those specific ingredients to make delicious pesto! You can literally make it with just about ANY greens and nuts/seeds you have on hand, as long as they're edible.

The greens in the batch I just made last week was primarily radish and carrot greens and fresh spinach, with a little bit of chives and Thai basil I snipped from my garden for good measure.


My rosemary isn't robust enough for harvesting any just yet, though I'm sure by next fall, I'll have plenty! My Thai basil, on the other hand, is going to town!
I've got some sweet, Italian basil just sprouted too. It'll be ready to harvest by next season.

Anyway, since you can use almost all ingredients that would often end up in the compost bin or landfill, this versatile paste of the gods is between dirt cheap and almost free. YAY!


So, as mentioned, the greens in this batch are carrot and radish tops, spinach, and just a bit of chives and Thai basil. For the nuts, I used mostly walnuts, with a small amount of pine nuts thrown in for good measure.
No seeds this time, though I'm definitely planning on making a batch (or two!) using roasted pumpkin/other fall squash seeds once I've got enough seeds saved up for that.

The cheese is a mix of Parmesan and Romano. Fresh (or frozen) cheese is always best, however, you can sub in the dried stuff in the can if it's all you've got.

I also added a splash of lime juice in this batch, just cause it sounded good, and the results were, indeed, good! I'll be doing that again for sure. 
It gave it a kind of extra brightness that really brought out the flavours in everything it's gone into so far (stay tuned for more recipes!)   
My clean up crew helpers agree that it tastes great! They each give it two paws up.
 
 I almost never have to scrape or soak anything before it goes into the dishwasher, with such an enthusiastic set of trusty assistants.
Alright; Enough of my rambling. Lets get to the recipe itself, for those who are still reading.


Presto Pesto Norwesto!


 Ingredients:
  •  ¼ – ½  cup nuts/seeds (pine nuts, walnuts, pecans, toasted pumpkin, melon, or squash seeds, sunflower seeds, etc...)
  • 2-3 cloves garlic
  • 2 - 3 cups packed carrot/radish/beet tops, spinach, kale, or other greens and/or fresh herbs (arugula, dill, basil, parsley, cilantro, rosemary, chives...whatever sounds good and is on hand!), roughly chopped.
  • ½ - ¾ cup extra virgin olive oil
  •     ¼ – ½  cup shredded/grated parmesan, romano, or other hard cheese (optional)
  •     salt and/or pepper, to taste (optional)
  •     other spices, as desired (optional)
  
Directions:

  • Put everything except olive oil, salt, and pepper into the food processor/blender and pulse until VERY finely minced or almost a paste-like consistency (to preference).
  • Add about ¼ cup of the olive oil and blend, drizzling in additional oil, as needed until desired consistency.
  • Stir in salt, pepper, and spices, if used, to taste.
  • Refrigerate or freeze in air tight container(s) until ready to use.
  • Presto Pesto!!
I usually vacuum seal things before they go into the freezer. It keeps them fresher, longer, and keeps them from getting freezer burnt. I've read a few places that pesto with cheese in it doesn't hold up well to freezing. I haven't found that to be the case. There's been no discernable difference between frozen and not frozen, so I suspect the people who wrote that didn't actually try it, or didn't package it properly before freezing. 

Yes, that label does say "lime Jews". It's an old family joke which has nothing to do with discriminating against anyone and everything to do with the funny things little kids say when trying to master speaking and language and words. So many things sound similar to one another! LOL For a good-to-print version of the recipe, click on over to Allrecipes.com, and click the print icon. Or tap on over.. I keep forgetting everyone does everything on their phones these days. (Dang kids! Get off my lawn!)

 Ginger doesn't care about words, language, talking, or writing down recipes. She just wants more of that yummy stuff!

Sugar appears to be in full agreement on that note.

We'll take it under advisement.

Friday, 29 September 2017

Don't throw away those soap slivers! (This week's money saving tip)

When your soap gets too small to use in the bath/shower effectively, move it to the sink for hand soap.
When that gets too small, put the pieces into the end of a nylon stocking (knee high, tights, pantyhose, really thin trouser sock, etc) and twist the opening and turn it over onto itself, or tie a half hitch at the end of it to close. Several soap scraps together in there will act just like a regular bar of soap and you will be able to use every, last speck, rather than throwing out perfectly good soap.

More uses for those little slivers and chunks of soap are:
  1. Use a small remnant of a full sized bar of soap is as a travel sized bar to stick in your travel supplies, camping gear, or go bag/bugout bag. 
  2. Put the pieces into a mug to use with a shaving brush.
  3. Save up the pieces to make a new bar of soap (same concept, but more attractive than the nylon)
  4. make your own liquid hand soap or body wash, by adding the slivers to an old soap dispenser bottle, along with some water.
  5. Use to "lubricate" stubborn zippers, sliding door/window tracks,and similar, by rubbing the dry chunk of soap against whatever needs to move more easily (you can also use wax from candle stubs, saved drippings, crayons, etc for this!).

Tuesday, 26 September 2017

Delicious, Nutritious, Hearty Bone Broth/stock for Free

This weeks thrifty food tip is how to make your own bone broth, absolutely free.


(I'm cheating here, and using lots of the wording from my vegetable broth post, so if it looks familiar, that'll be why!)


You can buy chicken or beef broth in cans, cartons, or powder at the store, but not only is it pretty expensive, even for the cheap stuff, but it is also usually full of preservatives and artificial flavours and colours and very high in sodium to boot. 

Instead, why not just make your own?

You'll need gallon freezer bags, a freezer, some cheesecloth 
(optional, but makes things much easier) or a wok skimmer or strainer, and a crock pot/slow cooker, rice cooker, Instant Pot, stock pot, or other large pot for simmering or pressure cooker, and a marker. 

Every time you have bones left from cooking (or bringing home a roasted chicken), save them. You can even ask for take away bags/boxes to save bones from when you eat out, if you like. After all, you DID pay for everything on your plate!

Put them in all in labelled freezer bags and keep them in your freezer (if you have a deep freezer, better still!)
I have some separate bags for chicken, turkey, beef, pork, etc, some for general poultry, some specifically for smoked meats. You can separate them however you like.
When a bag gets full, time to make your broth (or start a new bag and make the broth later.. whichever). 

  • Line your pot with the cheesecloth, if using and dump all the bones in. 
  • Fill to the top with water. 
  • Add any additional salt or seasoning, if desired.
  • Turn the crock pot on low and let it go for 8-16 hours. 
    •  If you're using a rice cooker, turn it to the "cook" setting until it starts boiling, then leave it on warm for the same amount of time. Check water level periodically and add as needed.
    • If using the stove, bring to a boil and then simmer on lowest possible setting for 3-5 hours, at least. Check water level periodically and add as needed.
    • If you're using the Instant Pot/pressure cooker, set it to manual/pressure for 90-120 minutes and let it do a natural release.
  • When it tastes like broth, turn off the heat and let it cool enough to handle. 
  • Pull up the cheesecloth and squeeze out all the liquid you can into the pot, or skim solids out with a wok skimmer or strainer. (The bones and scraps can then be composted or added to animal feed. Just make absolutely sure the bones are soft enough to easily crush with your fingers before giving to animals)
That's it!
Once it's done, you can use it right away, or you can freeze or can it. For freezing, I suggest using a rinsed out, cardboard milk carton, freezer bags, reditainers, or, if you want more measuring control when you use it, ice cube trays.


Tuesday, 11 November 2014

Vegetable broth for free!

This weeks thrifty food tip is how to make your own vegetable broth, absolutely free.

You can buy vegetable broth in cans, cartons, or powder at the store, but not only is it pretty expensive, even for the cheapo stuff, but it is also usually full of preservatives and artificial flavours and colours and very high in sodium to boot. 

Instead, why not just make your own?

You'll need a gallon freezer bag, a freezer, some cheesecloth

 (optional, but makes things much easier) or a wok skimmer and a crock pot/slow cooker, rice cooker, Instant Pot, stock pot, or other large pot for simmering or pressure cooker, and a marker. 

Every time you make a salad, trim veggies for dinner, slice onions, etc, there are some bits, like ends, stems, peels, and such that usually get thrown out. 

All you have to do is start saving those bits in a freezer bag kept in your freezer. Green onion caps, onion skins, celery and cucumber ends, tomato cores and stems, bell pepper seeds, stems and the white "pulpy" bits, artichoke stems, green bean ends, carrot peelings... You name it! Toss it all in the bag. When it gets full, time to make your vegetable stock (or start a new bag and make the stock later.. whichever). 


  • Line your pot with the cheesecloth, if using and dump all the trimmings in. 
  • Fill to the top with water. 
  • Add any additional salt or seasoning, if desired.
  • Turn the crock pot on low and let it go for 8-16 hours. 
    •  If you're using a rice cooker, turn it to the "cook" setting until it starts boiling, then leave it on warm for the same amount of time. Check water level periodically and add as needed.
    • If using the stove, bring to a boil and then simmer on lowest possible setting for 3-5 hours, at least. Check water level periodically and add as needed.
    • If you're using the Instant Pot/pressure cooker, set it to manual/pressure for 90-120 minutes and let it do a natural release.
  • When it tastes like broth, turn off the heat and let it cool enough to handle. 
  • Pull up the cheesecloth and squeeze out all the liquid you can into the pot, or skim solids out with a wok skimmer or strainer. (The veggies can then be composted or added to animal feed. Just take out any bits that are still too tough, like tomato stems, and beware of giving dogs onion, as they can be toxic to some dogs)
That's it!
Once it's done, you can use it right away, or you can freeze or can it. For freezing, I suggest using a rinsed out, cardboard milk carton, freezer bags,reditainers, or, if you want more measuring control when you use it, ice cube trays.


Monday, 10 November 2014

My Mom's "Pacific Northwest" Meatloaf, and the story behind it.

This delicious recipe was born of desperation, poverty, and one mom's creativity and determination to take care of her family in hard times. 

When we first came North, originally to Oregon, the job that my dad was promised turned out to be bunk, along with the advance for housing that was meant to come with it, so we camped in the Oregon wilderness for several months, while my dad went in search of work. He got a couple good leads in Seattle, so we continued further North, to what is now the suburbs of Issaquah (sub-suburbs?), but back then it was all wilderness, and camped until we could find some place to go. We ended up getting some help from St Vincent De Paul, in the form of a couple week's stay in a cheap motel in Seattle, so my dad would be able to find and get to work. He worked temp jobs until he got hired in his field at a real job, and we got a crappy, 2 bedroom apartment, but were still really struggling for the first several months. During that time, my mom did everything she could to save money and make every bit of food go as far as possible to keep us kids fed. Soon, she found out about food banks, and they really made a difference! That first trip to the food bank was another humiliation for my mom, who was raised to believe that "only poor white trash and (racial slurs) take  charity", but she did what she had to do. It was fall, so apples were in season and plentiful, and since it was near Thanksgiving, there was ground turkey (what poor people have for Thanksgiving dinner when the turkey hindquarters run out). You could always get all the stale bread and half rotten potatoes and onions you could carry at the food bank, so most meals incorporated those things, and this one is no different.  

This recipe uses about double the meat, far less bread crumbs, and lots more bacon than the original, for probably obvious reasons.
I added the allspice to the recipe 20 or so years ago, and my mom liked it, so it got "officially" added to the recipe. 

It can be stretched out quite a bit to feed more people for the same amount of meat. 


Ingredients:
  • 1 1/2 - 2 lbs ground meat (I use beef and turkey usually)
  • 1 med onion - chopped
  • 1 sm bunch green onion - chopped
  • 1 med apple - cored & chopped
  • 1 cup breadcrumbs/wheat germ/oats/bran/other grain
  • About a shot of Worcestershire
  • 2 eggs
  • Black pepper (to taste)
  • Salt (to taste)
  • About 1/4 tsp allspice
  • Bacon - several slices
  • Ketchup
Directions:

1. Preheat oven to 350° degrees
Mix all ingredients except bacon and ketchup together well in a large bowl.
2. Form a loaf (or reasonable facsimile) in a loaf pan or pretty much any other baking dish or cast iron skillet, leaving a small "trench" all around the edges of the pan (for grease to escape)
3. Cover top with a thin-med layer of ketchup.
4. Wrap and top loaf with bacon slices.
5. Bake @ 350° for about 1 hour or until meat thermometer reads 150°


Tuesday, 4 November 2014

Make your own homemade, healthy baby food for pennies!

Hi there! Here's this week's thrifty, healthy food tip...

Baby food is expensive, and the organic, no preservatives added sort is even MORE expensive! Why buy little jars of food for upwards of $10 per pound... and that's for the cheap stuff... when you can feed your baby the very same foods the rest of the family is eating for a tiny fraction of that!?

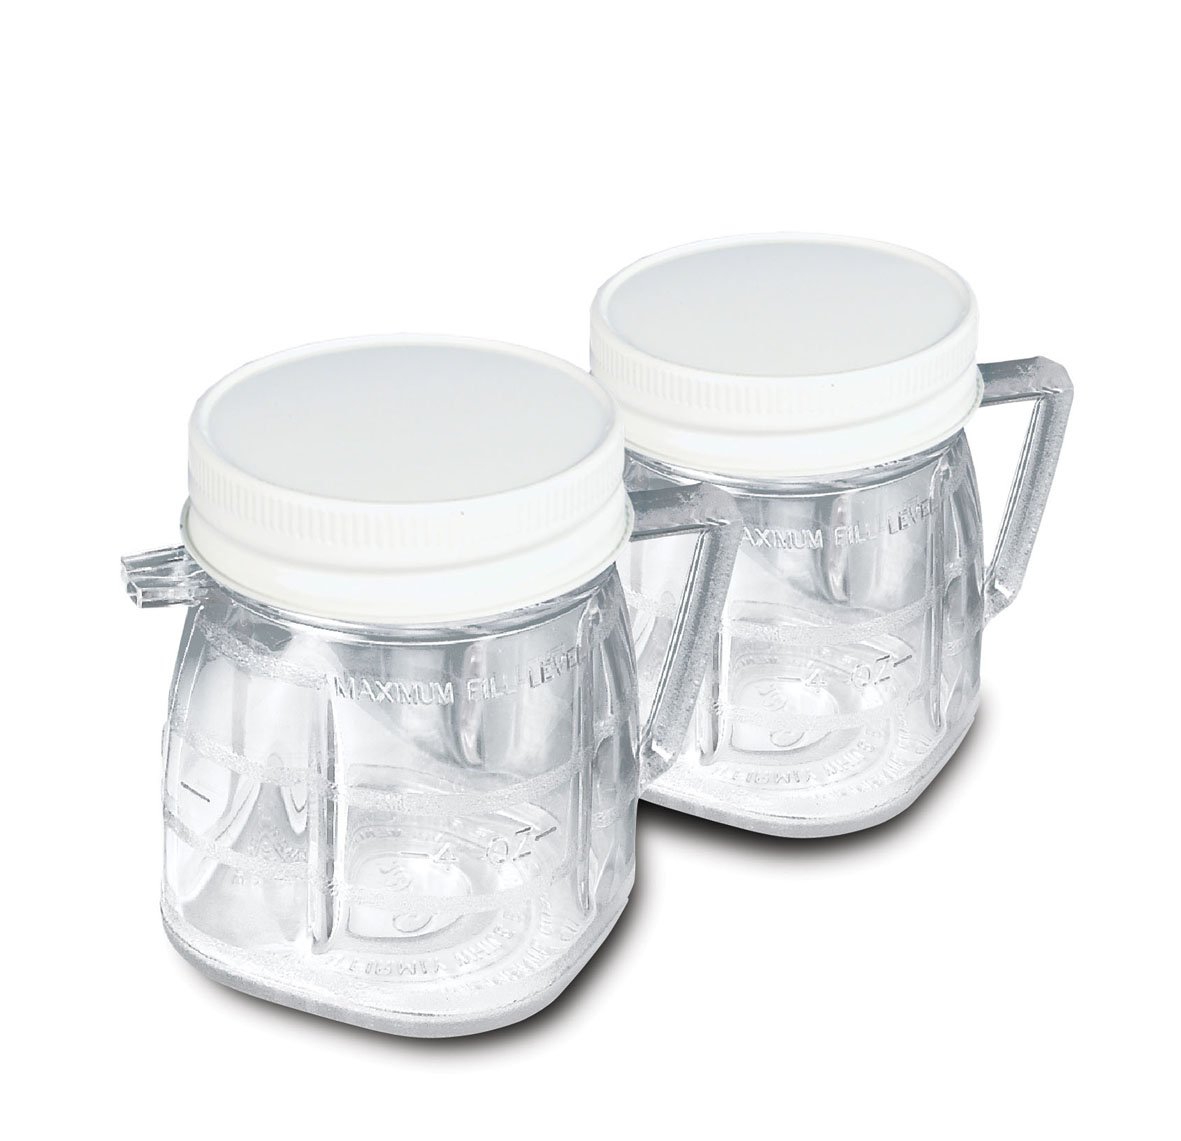
It's easy. All you need is dinner, some liquid to add for the correct consistency (broth, juice, breast milk, water, etc) and a blender or food processor! Those little mini blender containers you can get, like these pictured, are pretty handy, but you can also just use the regular blender jar, a mini, "bullet" type blender, stick blender, or food processor.

 Make sure that your blending container is clean before you start. You may want to run boiling water through it, just to be on the safe side.

All meats should be fully cooked, so if the steaks are rare, give baby's portions some extra time on the grill (or even in the microwave, if you must). You can put all the dishes in together, or, better still, to introduce your baby early on to varied tastes, blend them separately.

Blend the food to the consistency appropriate for your baby's stage of development, and, presto chango, baby food for pennies, and you have complete control over what goes into it!

This works for cereals and grains, meats, veggies, fruits, casseroles, quiche.. Pretty much anything! (I don't recommend salad! LOL)

I always made extra and froze it in ice cube trays to use later, when I didn't want to cook, but wanted the kids to have a healthy, home cooked meal. You can make different sized "cubes", depending on how much your baby tends to eat at one sitting. 20-30 seconds will heat up a full "cube" from a standard ice tray. Less than that if you're just thawing (like for fruits).

Friday, 31 October 2014

Propper Tactical Pants Mod


First off, I love, love,  LOVE these TDUs by Propper. They come in regular canvas, lightweight, and shorts, in a variety of colours and sizes. They are seriously the most comfortable ones I've found, and even come in very large sizes.

I've got a lot of Propper gear and so far, it's all been awesome.

Although these DO come in women's as well,
(and up to a size 24, ladies!), I always get men's ones, because I have very muscular legs/calves, and no butt or hips, so the men's ones fit me better. Thing is, men's pants are pretty much always too long, so I have to hem them. Not a big deal, and a lot of these style come un-hemmed anyway. 

So, since I already had to hem all of the long pants, I decided to go one better, and add some elastic cord in the cuffs. This way, I can blouse them, which is good for keeping water, bugs and other critters out, and also prevents flapping around and being in the way when barefoot or in sandals. 

Rather than just make them bloused all the time though, I used enough cord so that they will stay flat unless deliberately tightened, so they still will look sharp with boots or dress shoes.

Super simple! I just cut the hole, used a little fray check on the edges to keep it from fraying, and ran the cordage through.